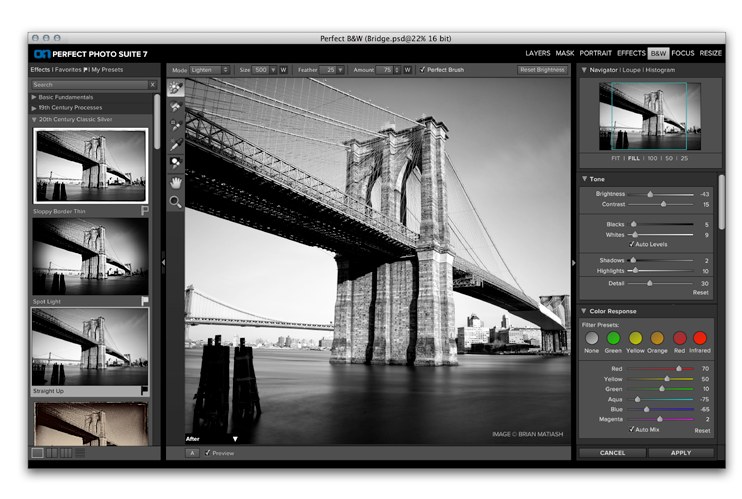
There are certainly lots of ways to convert your image to black and white, from in-camera renderings, through RAW processor presets, to a wide variety of options available to photographers within Photoshop. If you want the best result in the shortest amount of time however, you’re generally better off employing an application specifically engineered for the task: enter onOne Software’s Perfect B&W.
For starters, the application (Premium version) is designed to work in tandem with what you are probably already using, with plugins for Photoshop, Photoshop Elements, Lightroom, and Aperture. So from a workflow perspective, you’re already in familiar territory… just select the appropriate menu item in your RAW processor (e.g. File > Plugin Extras in Lightroom), and you’re immediately transported to the Perfect B&W interface, with your selected photo already opened. While you also have the option of running the application in stand-alone mode, we feel most will take advantage of the convenience afforded them by the plugin functionality. However, the software does indeed use fairly significant system resources, so if you’re on an older computer, you may wish to take advantage of the stand-alone option in order to get maximum performance from it.
Once Perfect B&W has loaded up, you’ll notice the interface is laid out in a manner similar to Lightroom, with your image occupying the central frame and editing options available at left and right. In the stand-alone version there are two buttons above the histogram at right: Layers and B&W, which serve as entry points to the two different aspects of the program, one for doing your conversion, and the other for making layer adjustments to it as you might in Photoshop. Note however, that if you’ve opened the image from within Photoshop, the layers option is disabled in favour of the powerful tools at your disposal from within that former application.
After opening the image, (and selecting the B&W button if you’re using the stand-alone application) the software performs a basic black and white conversion — pretty much retaining the brightness and contrast features of the original work. At left, you’ll be presented with a wide variety of presets which feature your image in preview mode as a thumbnail. If you’ve a large monitor, it is often helpful to drag the section divider to the right in order to display the thumbnails in a larger format to gain a better appreciation of your options in advance of selecting one.
Choosing a preset is a great starting point (and sometimes all you’ll need to do) to get your creations well on the road to realizing their full black and white potential. Once you’ve selected one, you’ll see the options in the right hand pane change to reflect your choice. You now have the colour mix, film grain, contrast curve, tone, blending modes and so on to edit, and enhance the image to your satisfaction. While you are able to create quite dramatic alterations in your photograph with just a few simple edits, we’d advise our readers to proceed with caution, as the end result can look ham-fisted and unnatural if you take things too far. Of course, there is always the undo option, should you find yourself having ventured into the realm of the absurd (which we did on several occasions while testing the limits of this software’s capabilities). Further, you may simply reselect the preset you started from, and all will be well again.
Grain Gain
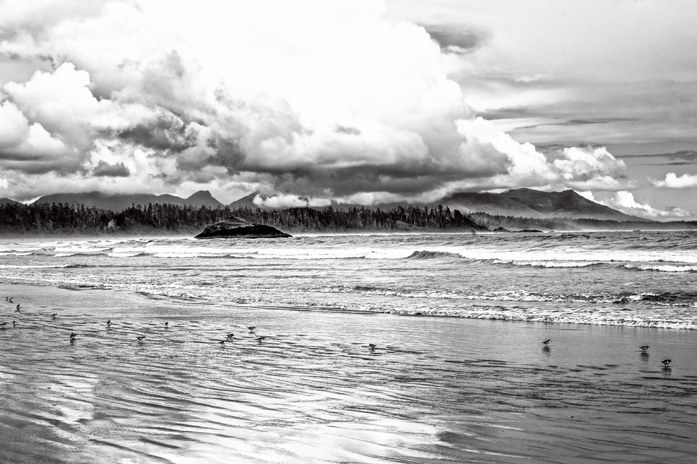
One of the main problems in creating black and white images with digital cameras, is the fact that they often lack texture — they’re just too smooth! Sure, you can pump up the ISO or add noise in Photoshop, but there’s just something missing when compared to old school film results. As a result, one of our favourite features in Perfect B&W is the ability to select from among 35 different classic film grains. onOne has faithfully reproduced the non-uniform nature of the grain exhibited by these stock films, not by simulating them in software, but by actually scanning the originals — there’s nothing like the real thing.
Within Perfect B&W you are free to adjust the intensity of the grain from zero through 100%, and even the size of it, up to 200%. This level of control is certainly welcome, especially for images that might already contain some degree of digital noise which you’d like to convert to a more pleasing, filmic look.
Fun Features
The toner panel opens up a wide variety of options to the photographer: from antique looks to futuristic styles, and everything in between. The sliders enable precision control of the effect, allowing for the addition of subtle hints of colour, or dramatic changes in cast — whatever the situation calls for. Of course, when employed in conjunction with the ‘Borders’ feature, you can really seal the deal on creating an authentic looking period picture; and many of these combinations are already available to you from within the ’19th Century Processes’ presets panel.
Further, the ‘Blending’ panel, which includes all the blend modes familiar to Photoshop users, allows you to create some really interesting effects by determining the method in which the new black and white layer is mixed with its underlying colour original. What’s more, the ‘Glow’ panel enables you to add an ethereal quality to your images — perfect for that dreamy portrait or mystical landscape shot. Fun!
Finally
To put the finishing touches on your photo, Perfect B&W includes full-featured vignette and sharpening modules. While the former is pretty much a replica of what you’d get in Lightroom or Adobe Camera RAW (though the addition of the ‘Style’ menu which includes Normal, Soft, and Subtle variations is a nice touch), the latter is definitely worth investigating!
The last thing you generally want to do with your image in the processing chain is sharpen it. Unfortunately, it is at this stage where many people go too far and ruin what would otherwise be an excellent photograph. Folks seem hung up on sharpness as an end in itself — “hey, I have this tack-sharp lens and an amazing camera body, why shouldn’t my images look ridiculously sharp?!” Well, there’s sharp, there’s too sharp to be flattering (particularly in portraits), and then there’s straight-up unnatural.
Fortunately, Perfect B&W allows such a high degree of control over the sharpening process, and can provide so many pleasing variations, that hopefully photographers will exercise a modicum of good taste when employing it. First, there are three kinds of sharpening available: Progressive, the default, which is best for images that contain a lot of fine detail; High-Pass, which users are better off selecting should their image portray larger shapes with fewer fine details; and Unsharp Mask, which anyone who has used Photoshop should be well familiar with. Beneath this drop-down are sliders which control the amount of the effect applied, a Halo option for creating more edge contrast (be careful with this one!), and sliders which enable the user to preserve both highlights and shadows from over-sharpening and introducing unwanted noise. Finally, there is a control for preserving skin tones from the negative effects of sharpening and even a drop-down which allows you to select the ethnicity of the subject in question. Fantastic!
In testing we really ran onOne’s Perfect B&W through the wringer: importing huge files, selecting multiple effects while the image was still processing, maxing out the settings to see what kinds of digital abominations we could create, and more. We were only able to make it crash once (and we were really trying here), and for the most part the software stood up to our abuse admirably. In terms of utility, price, and the stunning images this application is capable of rendering, we can heartily recommend its purchase to anyone interested in getting the most out of their black and white photography.