While in the last issue of DarkroomPro, we covered the release of Adobe Photoshop Lightroom 5, and highlighted the major new features, we thought this time around we’d provide some tips and tricks to help our readers get the most out of this versatile software package. The application is certainly chock full of somewhat hidden goodies, so let’s just dive right in!
Smarter Collections
Smart collections were introduced way back in Lightroom 2, and enabled the user to automatically group images together based on specific metadata; for example, those shot with a particular lens. Now Lightroom 5 offers you even more options to employ as collection inclusion criteria. By adding a new smart collection, or supplying additional rules to an existing one, you are able to select by bit depth, colour mode (greyscale to add all your black and whites for example), colour profile, the existence of a smart preview (which is great for discovering which ones don’t and thereafter adding them), and file type — which now even includes PNG support. Very smart indeed!
Standard Collections have also been upgraded with the option to set one up as a ‘Target Collection’, which affords you the ability to add images to it by simply hitting the ‘B’ key with a photo or series of photographs selected. This is far easier and faster than dragging and dropping them to the desired collection. You may either create a new collection and specify your wish to set it as the target, or add this option to an existing collection by right clicking on it and choosing ‘Set as Target Collection’. Note however, you may of course only have one target collection active at any given time.
Preferable Previews
Lightroom has always been great at moving between different views of your work, comparing and contrasting between prospective selects and so on; however, the way some of these features were implemented left a little to be desired. Version 5 has tweaked some of these more familiar workflows to make them more convenient. For example, hitting the ‘F’ key, which heretofore cycled through various diminutions or additions to the interface to either give you a larger or smaller view of the image you were working on, now gives you a full screen view of your photo immediately. This is welcome news to most! For those that still wish to utilize the previous behaviour, fear not: it’s still available by simply hitting Shift-F instead, and cycling through the various views.
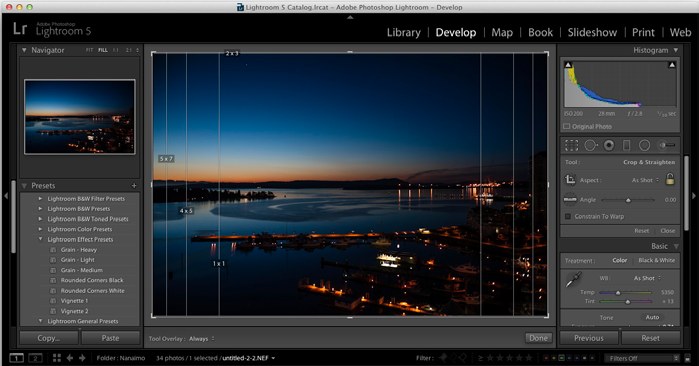
Additionally, the crop tool overlays have been enhanced. While certainly most are familiar with the standard grid and rule of thirds guides in the crop tool overlay, you now have access to crop mark overlays for various aspect ratios. For example, you might wish to see what an image might look like when printed 4×5… simply cycle through the various crop overlays by hitting the ‘O’ key while in the Develop module with the Crop tool selected, and soon you’ll see crop aspect guides over top of your photograph.
While doing this, you may have noticed overlays you were unfamiliar with… spiral, diagonal, triangle etc. Don’t worry if you never use these, and don’t want to cycle through them every time. You can choose what options you’ll see while progressing through them by selecting your preferences under ‘Tools – Crop Guide Overlay – Choose Overlays to Cycle’. Additionally, you can determine which aspect ratios you’d like to display by selecting from those available under ‘Tools – Crop Guide Overlay – Choose Aspect Ratios’. Handy!
One more notable addition to image preview in Lightroom 5 has been the inclusion of grids and guides in Loupe mode. To access these, all the user need do is to enable them from under the ‘View – Loupe Overlay’ menu. Holding down cmd on Mac, or control on Windows, with the grid enabled allows you to alter the size of the grid elements, as well as determine its opacity in order that it not obstruct your view of the underlying image. Additionally, with this key depressed, the guide can be repositioned by dragging the intersection with the mouse. Further, to centre one of the guidelines, simply double click on it.
Proof It!
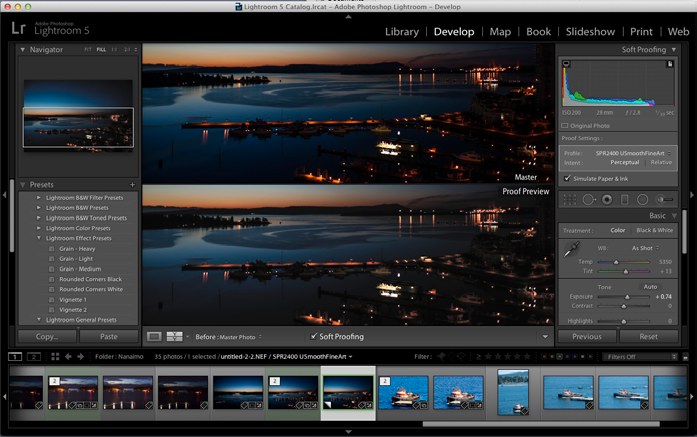
For those of us who do a lot of printing — and we hope you’re among them — soft proofing is a key step in determining what the final product will look like on the substrate you have elected to render the image on. Omitting this procedure could well leave you frustrated, and cost you unnecessary ink and paper expenditures.
While in previous versions, Lightroom provided this facility, accessible by selecting the ‘S’ key in the Develop module, you weren’t able to see the current image and the proof side-by-side… until now. Version 5 enables the user to employ the Before and After button while in Soft Proof mode to spot differences in what appears on your screen and what’s likely to be printed, in a significantly more convenient manner. You can see the images side-by-side, top and bottom, or split screen (our favourite) in either of these configurations. Printing perfection just got easier.
In The Lab
For those of us well familiar with the Lab colour space, its uses are myriad. Those less so, will find our ‘Demystifying Lab’ article elsewhere in this issue very helpful indeed! In an effort to cater to the former group, Adobe has included the ability to view Lab colour values. All one need do is right click on the histogram, select ‘Show Lab Color Values’, and then mouse over any portion of the image to see the exact measure of this location in Lab. While a nice little addition to Lightroom, most Lab work will still be done in Photoshop; though we look forward to future versions which may include enhanced support for this very interesting gamut.
Well there you have it — some of the lesser known, yet powerful features from what will undoubtedly prove to be the go-to RAW processor and cataloguing software for discerning photographers everywhere. Congratulations Adobe, on a truly worthwhile product release.